
This document will guide you through the process of creating a “product finder” for your web site leveraging the MetaLocator category system. In MetaLocator can create a product finder in many ways, but we focus on these three common scenarios:
Product Finder Using Categories: (this article) In this scenario we will use Categories to allow our users to search for types of products and the stores that may carry them. This is useful when you have a relatively limited number of product categories (E.g. < 20-50). This is the scenario described in this document and is the simplest method of creating a product finder in MetaLocator.
Inventory Product Finder: In this example, you have many products and many stores, and each store’s inventory of your products may vary.
Linking to a specific product or category: Here we show you how to create a link which will display the stores that carry a certain product. You may then use this link to create a Where to Buy button on your Web site’s eCommerce pages.
The scenario described in this article uses the MetaLocator Category system to associate certain categories with certain stores. We’re going to assume that you have already imported your list of stores. If not, please see our Quick Start Guide and support documentation for further guidance on that preliminary step.
Step 1: Create Categories for each product or product type.
We will create 3 Categories, Coffee Grinders, Brewers and Mugs. To create a Category, click Categories on the main navigation on the left, then New in the toolbar. Enter the Category name and click save. Repeat the process for each category.

You can also import categories in bulk along with your data. To import categories, add columns to your import spreadsheet as shown in the example below as tag1, tag2, tag3. These can also be specified as category1, category2 and category3 respectively. These values will become categories associated with the corresponding location upon import.
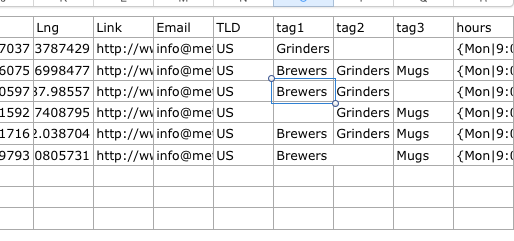
MetaLocator will automatically create any categories it does not already have in the system during the import. Notice in the sample above the product categories vary by location. This allows the import of both inventory and location data in the same spreadsheet.
Our list of Categories now looks like this:

You can create as many categories as needed. Once your locations have been categorized with the appropriate product categories, click Data -> All Records, and you will see the categories in the list as shown here:

Now we’re ready to create an interface that allows your customers to show your locations, and optionally filter those results based on the product types (or “Categories”) designated for that location.
Step 2: Create an Interface to display your Product Finder.
To begin this step, click Interfaces, then New in the toolbar. Choose any template that matches your desired layout. In this example, we'll chose Store Locator, then Rich Media.
We're going to display our list of categories in a drop-down list. You have the option of also using a series of checkboxes. Checkboxes are handy when you would prefer to allow your customer to search for stores that carry more than one product.
The Rich Media template already includes a drop-down list of "products" as shown, before any changes are made.

Notice the drop-down list of categories that allows for a basic search by product category. Adjust the label of the drop-down to read "Product" by expanding the Category option, and providing a label as shown below:

Here is a completed Interface which allows searching by Product and location.
