This tutorial covers the basics of retrieving location search results in an iOS App.
Many different types of mobile apps require locator technology. This includes bank branch locators, retail store locators and where-to-buy product finders. Embedding this technology on a Website is straightforward with MetaLocator, whereas embedding a locator into an iOS app can require some programming. This tutorial covers the basics of creating a store locator app in Swift, the most recent programming language from Apple.
MetaLocator's API makes this development process much simpler by providing a complete RESTful API and Web-based control panel. This allows an organization to expose the management of location data to marketing staff and content managers while allowing developers to focus on implementing the technology. We also handle the complexities of international geocoding, leveraging user location and location-based searching.
Implementing a store locator in iOS with MetaLocator requires access to our PaaS API. This is available as an account add-on, or as part of an Enterprise subscription. Contact the helpdesk to have the API added to your free trial account. Making your first API call is simple once you have access. Our documentation contains complete examples of important API queries used in a mobile locator, such as the Search API call.
Before we dive into the specifics of the app, let's get an overview of what we're hoping to accomplish in this example. We'll create a basic search interface that allows the user to enter a zip code, and display locations nearest to them. There's much more we can do, but we will keep it simple for this example.
Create the XCode Project
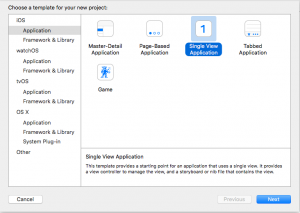
We are starting with a simple table view. Create a new iOS Application project in XCode, a Single View Application will do for this tutorial as shown below:
This will create a project with a single view.
Update the StoryBoard
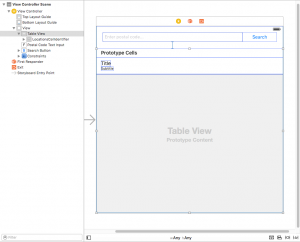
Drag a new Table View on to the View Controller. Add a single prototype cell in the Attribute Inspector.
Also drag in a Text Input and a Button and arrange as shown below.
Add the MetaLocation Class
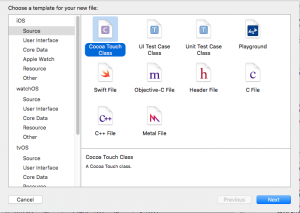
Insert a new Cocoa Touch File into the project. This will contain a class that represents locations from MetaLocator's API.
Name the file MetaLocations, and choose NSObject as the base class.
Insert the following code into the new MetaLocations.swift file in your project.
//
//  MetaLocations.swift
//  MetaLocatorSample
//
//  Created by Michael Fatica on 8/19/16.
//  Copyright © 2016 MetaLocator. All rights reserved.
//

import UIKit

class MetaLocations: NSObject {

    let name: String
    let desc: String?
    var Distance: Double?

    init(name: String, desc: String? = "",link: String? = "",Distance: Double? = nil) {
        self.name = name
        self.desc = desc
        self.Distance = Distance

    }

}
Update the View Controller
Replace the ViewController.swift's code with the following code:
//
//  ViewController.swift
//  MetaLocatorSample
//
//  Created by Michael Fatica on 8/19/16.
//  Copyright © 2016 MetaLocator. All rights reserved.
//

import UIKit

class ViewController: UIViewController, UITableViewDelegate, UITableViewDataSource {


    let defaultSession = NSURLSession(configuration: NSURLSessionConfiguration.defaultSessionConfiguration())
    var dataTask: NSURLSessionDataTask?

    //the location search input
    @IBOutlet weak var postalCodeTextInput: UITextField!

    //the search button
    @IBOutlet weak var searchButton: UIButton!

    // Data model: These MetaLocation objects will be the data for the table view cells
    var locations:[MetaLocations] = []

    // cell reuse id (cells that scroll out of view can be reused)
    let cellReuseIdentifier = "LocationsCellIdentifier"

    // don't forget to hook this up from the storyboard
    @IBOutlet var tableView: UITableView!

    //when the user clicks the search button, load the results
    @IBAction func searchButtonClick(sender: AnyObject) {
        self.loadLocations(self.postalCodeTextInput.text!)
    }

    override func viewDidLoad() {

        super.viewDidLoad()

        // Register the table view cell class and its reuse id
        self.tableView.registerClass(UITableViewCell.self, forCellReuseIdentifier: cellReuseIdentifier)

        // This view controller itself will provide the delegate methods and row data for the table view.
        tableView.delegate = self
        tableView.dataSource = self

    }

    // number of rows in table view
    func tableView(tableView: UITableView, numberOfRowsInSection section: Int) -> Int {
        return self.locations.count
    }

    // create a cell for each table view row
    func tableView(tableView: UITableView, cellForRowAtIndexPath indexPath: NSIndexPath) -> UITableViewCell {

        //Use the SubTitle style so we can display the location name and distance
        let cell = UITableViewCell(style: UITableViewCellStyle.Subtitle, reuseIdentifier: cellReuseIdentifier)


        //set the cell label to teh location name
        cell.textLabel?.text = self.locations[indexPath.row].name

        //add the distance if we have it.
        if(self.locations[indexPath.row].Distance != nil){
            cell.detailTextLabel?.text = "\(String(format:"%.0f", self.locations[indexPath.row].Distance!)) miles away"
        }else{
            cell.detailTextLabel?.text = "Near you!"
        }

        return cell
    }

    // method to run when table view cell is tapped
    func tableView(tableView: UITableView, didSelectRowAtIndexPath indexPath: NSIndexPath) {
        //@TODO: Show a detail page when the user clicks a row
        //print("You tapped cell number \(indexPath.row).")
    }

    /// This function loads the locations around a provided `postalCode`
    /// :param: The postalCode to be searched around
    func loadLocations(postalCode: String) {

        //remove the existing items
        locations.removeAll()


        if dataTask != nil {
            dataTask?.cancel()
        }

        UIApplication.sharedApplication().networkActivityIndicatorVisible = true

        //Enter your Interface ID number for the Itemid
        let Itemid = INSERTTHEIDNUMBEROFANINTERFACEINYOURACCOUT;

        //Set your MetaLocator APIKey, username and password
        let apikey = "INSERTYOURMETALOCATORAPIKEYHERE";
        var username = "INSERTYOURAPIUSERNAME";
        var password = "INSERTYOURAPIPASSWORD";

        //ensure safe handling of special characters in the username and password
        username = username.stringByAddingPercentEncodingWithAllowedCharacters(.URLHostAllowedCharacterSet())!

        password = password.stringByAddingPercentEncodingWithAllowedCharacters(.URLHostAllowedCharacterSet())!

        //the MetaLocator PaaS API Search function, with a hard-coded limit of 10 locations
        let url = NSURL(string: "https://code.metalocator.com/webapi/api/search?Itemid=\(Itemid)&apikey=\(apikey)&username=\(username)&password=\(password)&postal_code=\(postalCode)&limit=10");


        //var urlString: String = url!.absoluteString

        //
        dataTask = defaultSession.dataTaskWithURL(url!) {
            data, response, error in
            //
            dispatch_async(dispatch_get_main_queue()) {
                UIApplication.sharedApplication().networkActivityIndicatorVisible = false
            }
            //
            if let error = error {
                print(error.localizedDescription)
            } else if let httpResponse = response as? NSHTTPURLResponse {
                if httpResponse.statusCode == 200 {

                    self.updateLocations(data)
                }
            }
        }
        //
        dataTask?.resume()


    }

    /// This function takes the API results, parses the JSON and creates a series of MetaLocation objects
    /// :data: The raw JSON text of the MetaLocator API Request.
    func updateLocations(data: NSData?) {

        do {

            let json = try NSJSONSerialization.JSONObjectWithData(data!, options: .AllowFragments)


            if let json = json as? NSArray {

                for jsonRow in json {

                    //if the name key has a string value
                    if let name = jsonRow.valueForKey("name") as? String {

                        //get the distance as a Double
                        let distance = jsonRow.valueForKey("Distance")?.doubleValue

                        // cretae a new MetaLocations object with this name and distance
                        let location = MetaLocations(name: name,desc: "",Distance: distance)

                        //add it to the views list of locations
                        self.locations.append(location);

                    }

                }
            }

        } catch {
            print("error serializing JSON: \(error)")
        }


        dispatch_async(dispatch_get_main_queue()) {

            //queue a refresh of the table view data
            self.tableView.reloadData()

        }
    }
}
Connect the Storyboard elements to the View Controller
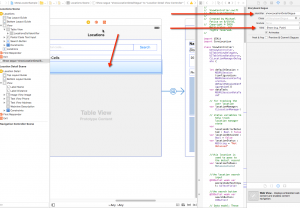
Control-drag the TableView, Text Input, Search Button and the Click Action to the View Controller. This control-drag is difficult to screenshot since it involves holding down the control key. Here is a video of that process:
Update the user access information in the View Controller
Change the lines below, found in the ViewController to the information that corresponds to your account.
        //Enter your Interface ID number for the Itemid
        let Itemid = INSERTTHEIDNUMBEROFANINTERFACEINYOURACCOUT;

        //Set your MetaLocator APIKey, username and password
        let apikey = "INSERTYOURMETALOCATORAPIKEYHERE";
        var username = "INSERTYOURAPIUSERNAME";
        var password = "INSERTYOURAPIPASSWORD";
Build and run the app. You should be able to perform basic postal code searches of your data. This is a very basic locator at this point.
Detecting and using the user's location
One of the best aspects of mobile locators is that you can more readily obtain the user's GPS location. This is a relatively simple addition to our app. First, we need to import CoreLocation, as done by adding this line to the tome of ViewController.swift.
import CoreLocation
Then, in viewDidLoad, we can request permission from the user to use the location when the app is in the foreground.
// This view controller itself will provide the delegate methods and row data for the table view.
        tableView.delegate = self
        tableView.dataSource = self

        if CLLocationManager.locationServicesEnabled() {
            locationManager.delegate = self
            locationManager.desiredAccuracy = kCLLocationAccuracyNearestTenMeters
            locationManager.startUpdatingLocation()
        }
The startUpdating location will invoke a function whenever the user's location changes, based on the accuracy model we've provided. Within that function, we'll call the loadLocations method, but this time passing in the user's location as latitude,longitude. MetaLocator's Search API method can take a latitude and longitude pair in the postal_code parameter.
// this function is called every time the user's location is updated.
    func locationManager(manager: CLLocationManager, didUpdateLocations locations: [CLLocation]) {
        let locValue:CLLocationCoordinate2D = manager.location!.coordinate

        if (locationObtained == false) {
            locationObtained = true

            //pass the comma-separated latitude/longitue to loadLocations
            let searchString: String = "\(locValue.latitude),\(locValue.longitude)"
            self.loadLocations(searchString)

        }
    }
Need more? Contact us and request additions to this tutorial, there's obviously a lot more we could do in this app.
Adding a Detail View and Navigation
A simple list of locations isn't really going to cut it. Sure, it displays locations ordered by distance from your location, but it doesn't provide any detail or contact information about those locations. Our objective in this step is to make those location rows clickable, and present a single location detail when the row is tapped. It should also display a "Back" button to allow the user to move back and forth. In order to add a detail view, we first need to add a Navigation Controller to our current view, by first selecting our single View Controller, then choosing Editor > Embed In > Navigation Controller.
Then, insert a new View Controller and Control-Drag the prototype cell to the new View Controller.
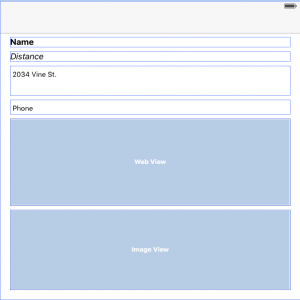
We also added a number of details to the new View Controller including full address information, a WebView to hold the location Description and an ImageView to hold the location image.
Since the description is a WebView, it will correctly display the properly formatted HTML found in the MetaLocator description field.
Now we can add a new Cocoa Touch Class to the project to handle the details. We called this LocationDetail, and chose UIViewController as the base class. We then Control drag each new UI element into this new class to connect the various variables to the layout display.
In order to pass the location the user chose to this new detail controller we created a variable in the LocationDetail controller called
var receivedLocation:MetaLocations!
This gets initialized to the chosen location in the main tableView didSelectRowAtIndexPath as shown below:
// method to run when table view cell is tapped
    func tableView(tableView: UITableView, didSelectRowAtIndexPath indexPath: NSIndexPath) {

        tableView.deselectRowAtIndexPath(indexPath, animated: true)

        //initialize a local MetaLocations object to the object at the chosen row index
        let loc = self.locations[indexPath.row] as MetaLocations

        //set our controllers locationToPass as this location
        self.locationToPass = loc

        //perform the segue
        performSegueWithIdentifier("showLocationDetailSegue", sender: self)


    }
Then, in a related function we take that locationToPass object and use it to initialize a MetaLocations object in the LocationDetail class
    override func prepareForSegue(segue: UIStoryboardSegue, sender: AnyObject?){

        if (segue.identifier == "showLocationDetailSegue") {

            // initialize new view controller and cast it as your view controller
            let viewController = segue.destinationViewController as! LocationDetailViewController

            // your new view controller should have property that will store passed value
            viewController.receivedLocation = self.locationToPass

        }

    }
This uses the receivedLocation member in the LocationDetail class to receive the selected location. These various members are all initialized with the receivedLocation object in the viewDidLoad method.
//
//  LocationDetailViewController.swift
//  MetaLocatorSample
//
//  Created by Michael Fatica on 8/22/16.
//  Copyright © 2016 MetaLocator. All rights reserved.
//

import UIKit

class LocationDetailViewController: UIViewController, UIWebViewDelegate {

    var receivedLocation:MetaLocations!

    @IBOutlet weak var labelName: UILabel!
    @IBOutlet weak var labelDescription: UILabel!
    @IBOutlet weak var labelDistance: UILabel!
    @IBOutlet weak var imageViewImage: UIImageView!
    @IBOutlet weak var textViewAddress: UITextView!

    @IBOutlet weak var webviewDescription: UIWebView!
    @IBOutlet weak var textViewPhone: UITextView!

    override func viewDidLoad() {

        super.viewDidLoad()

        labelName.text = receivedLocation.name

        webviewDescription.scrollView.scrollEnabled = false

        webviewDescription.loadHTMLString((receivedLocation?.desc)!,baseURL: nil)

        labelDistance.text = receivedLocation.getFormattedDistance()

        //download the location image into the app
        receivedLocation.pullImage()

        imageViewImage.image = receivedLocation.imageData

        textViewAddress.text = "\(receivedLocation.address)\(receivedLocation.address2) \(receivedLocation.city),\(receivedLocation.state) \(receivedLocation.postalcode)"

        textViewPhone.text = receivedLocation.phone

        webviewDescription.delegate = self

    }
The entire project at this point, can be downloaded here: MetaLocatorSample. You have probably noticed that this app lacks a lot of polish and functionality. As this post evolves we will continue to provide updates to further refine the application. Please let us know if you have used this tutorial on Twitter.

